For the complete documentation index, see llms.txt. This page is also available as Markdown.

Organization, Merchant, and Profile

Understand Hyperswitch's three-level hierarchy of Organization, Merchant Account, and Profile.

Picking the right account structure is the first architectural decision when setting up Hyperswitch. The platform supports a three-level hierarchy that scales from a single business to a marketplace with many sub-merchants:

  • Organization: the top-level entity for your business.

  • Merchant Account: a unit under an organization with its own API keys.

  • Profile: the most granular layer, where payment configuration (routing, webhooks, return URLs) actually lives.

Every payment in Hyperswitch is tagged with a profile, which determines which routing rules and connector credentials are used.

When you sign up on the Control Centre, an Organization is created for you with one Merchant Account and one Profile already in place. You're assigned the Organization Admin role, which lets you invite teammates and grant them roles at any level.


The Hierarchy

Organization

The Organization represents your overall business. It's the top-level container for everything below. Roles and permissions can be assigned at the Organization level so admins can govern the whole structure.

Merchant Account

A Merchant Account sits under an Organization and holds its own api_key and publishable_key for authentication. You can create as many merchant accounts as you need under one Organization, typically one per business line, brand, or sub-merchant.

Profile

A Profile (sometimes called a business profile) is a logical separation within a merchant account. Each profile is identified by a unique profile_id and is the level where the actual payment configuration lives:

  • Routing algorithm

  • Webhook URL and return URL

  • Connector configurations (each connector under a profile is identified by a globally unique merchant_connector_id and a per-profile label)

A connector configured under one profile cannot route payments under a different profile. This is intentional: profiles are the boundary for payment-side configuration.


Choosing Between Multiple Merchant Accounts and Multiple Profiles

The hierarchy gives you two ways to organise multiple business lines or sub-merchants. The right choice depends on whether you need separate API keys per unit.

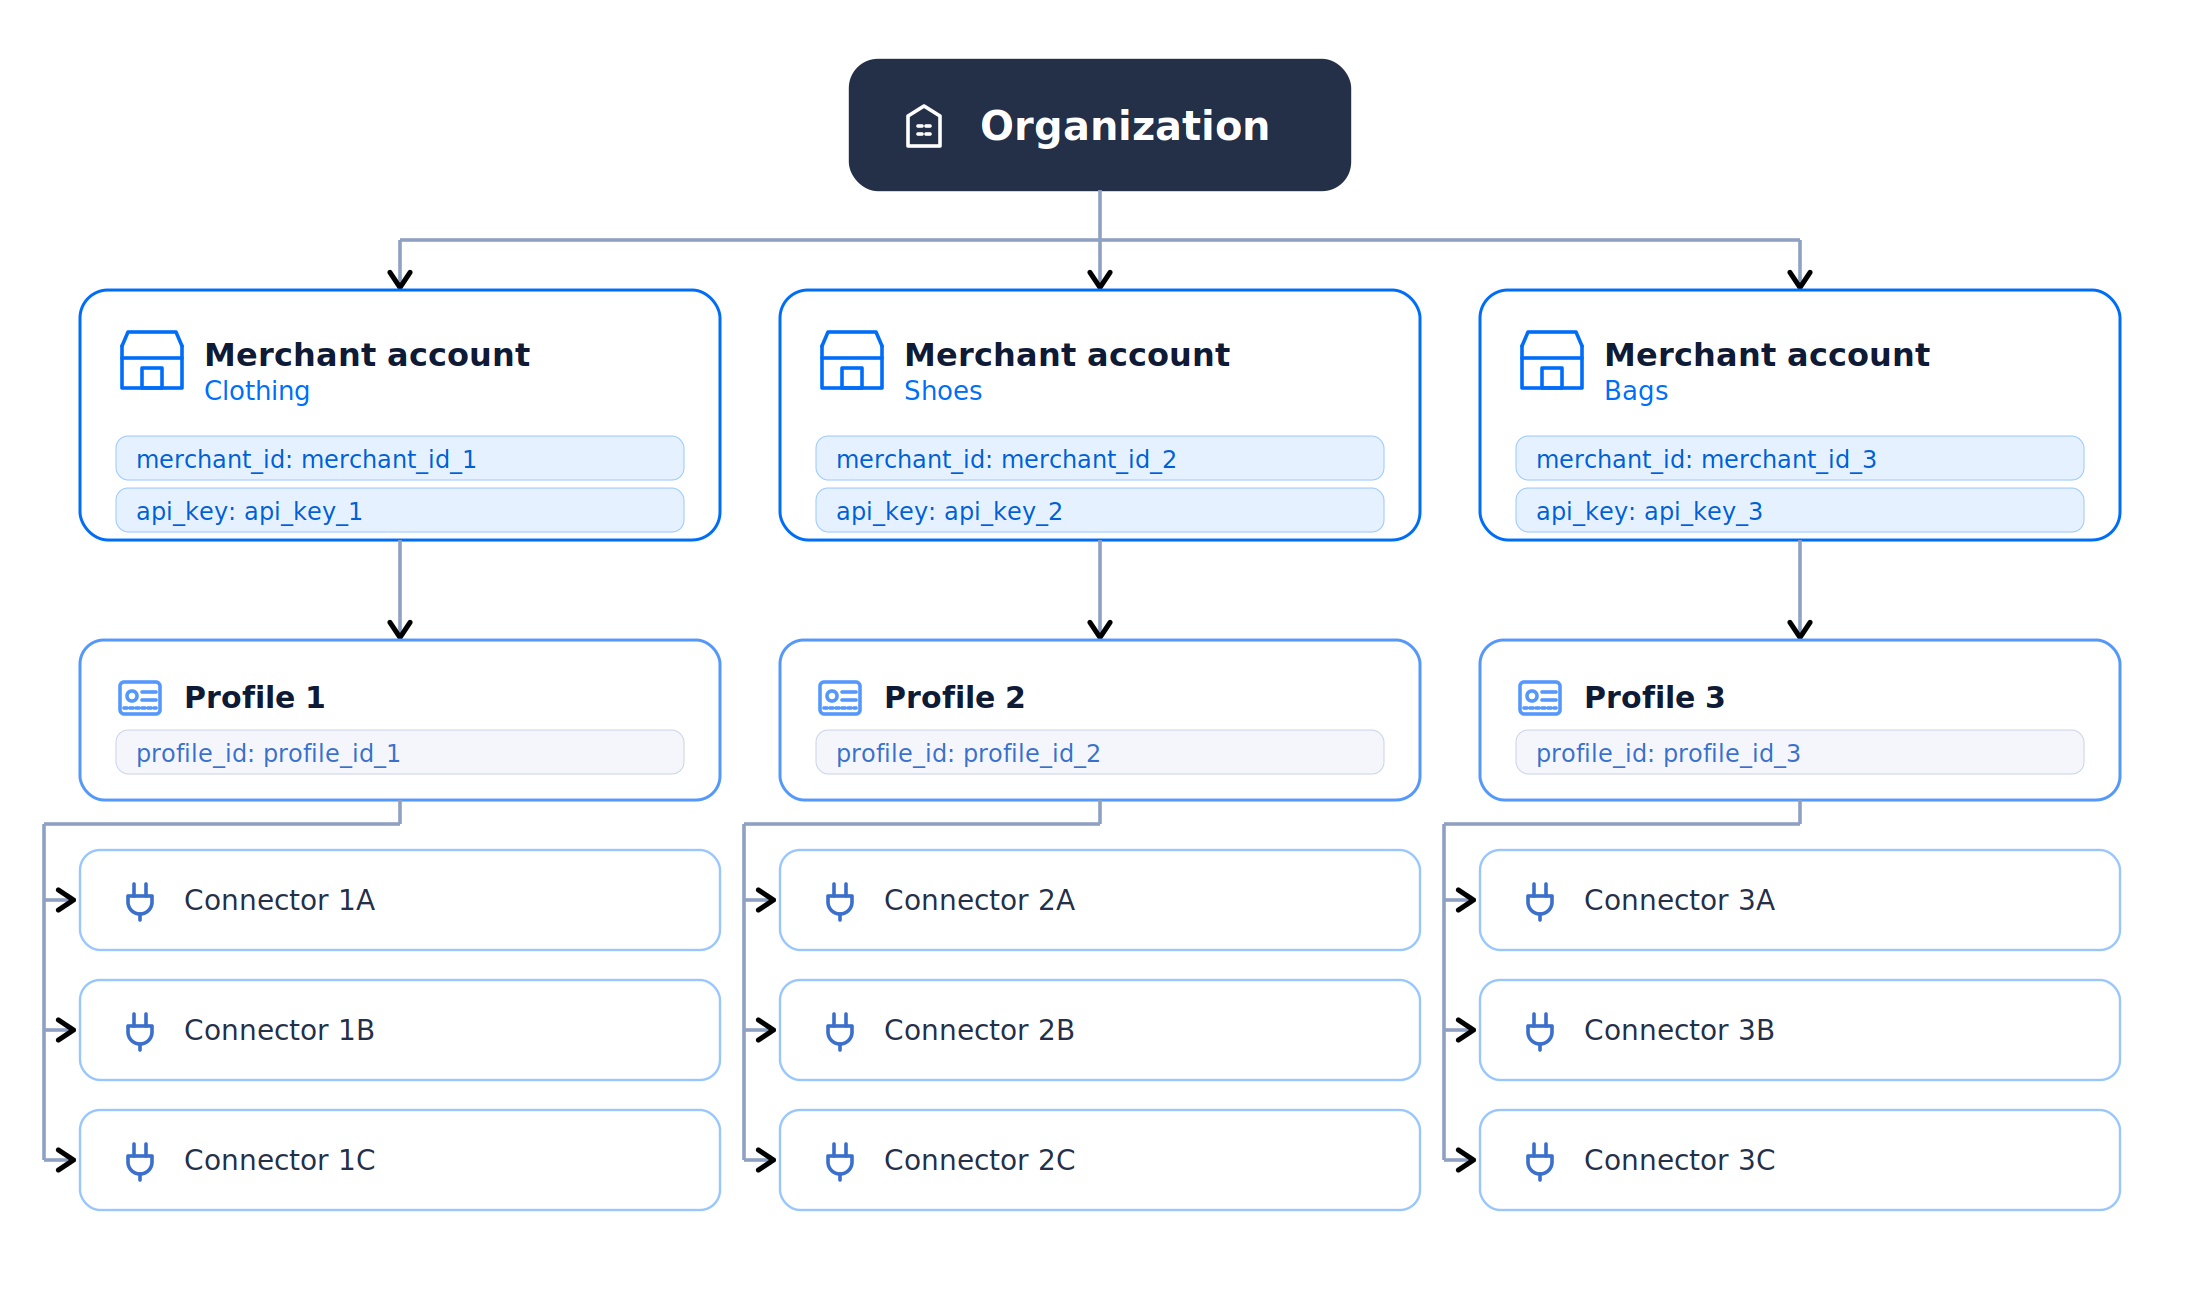
Multiple Merchant Accounts (separate API keys per unit)

Use multiple merchant accounts when each business line or sub-merchant needs its own API key. Common scenarios:

  • A retailer with three brands (Shoes, Clothing, Bags) wants each brand to integrate with a separate API key.

  • A marketplace where each sub-merchant integrates the API key directly into their own systems.

Organization with multiple Merchant Accounts (Clothing, Shoes, Bags), each with its own API key, Profile, and Connectors
One Organization with multiple Merchant Accounts, each having its own Profile and Connectors
Multiple Profiles (one API key, segmented configuration)

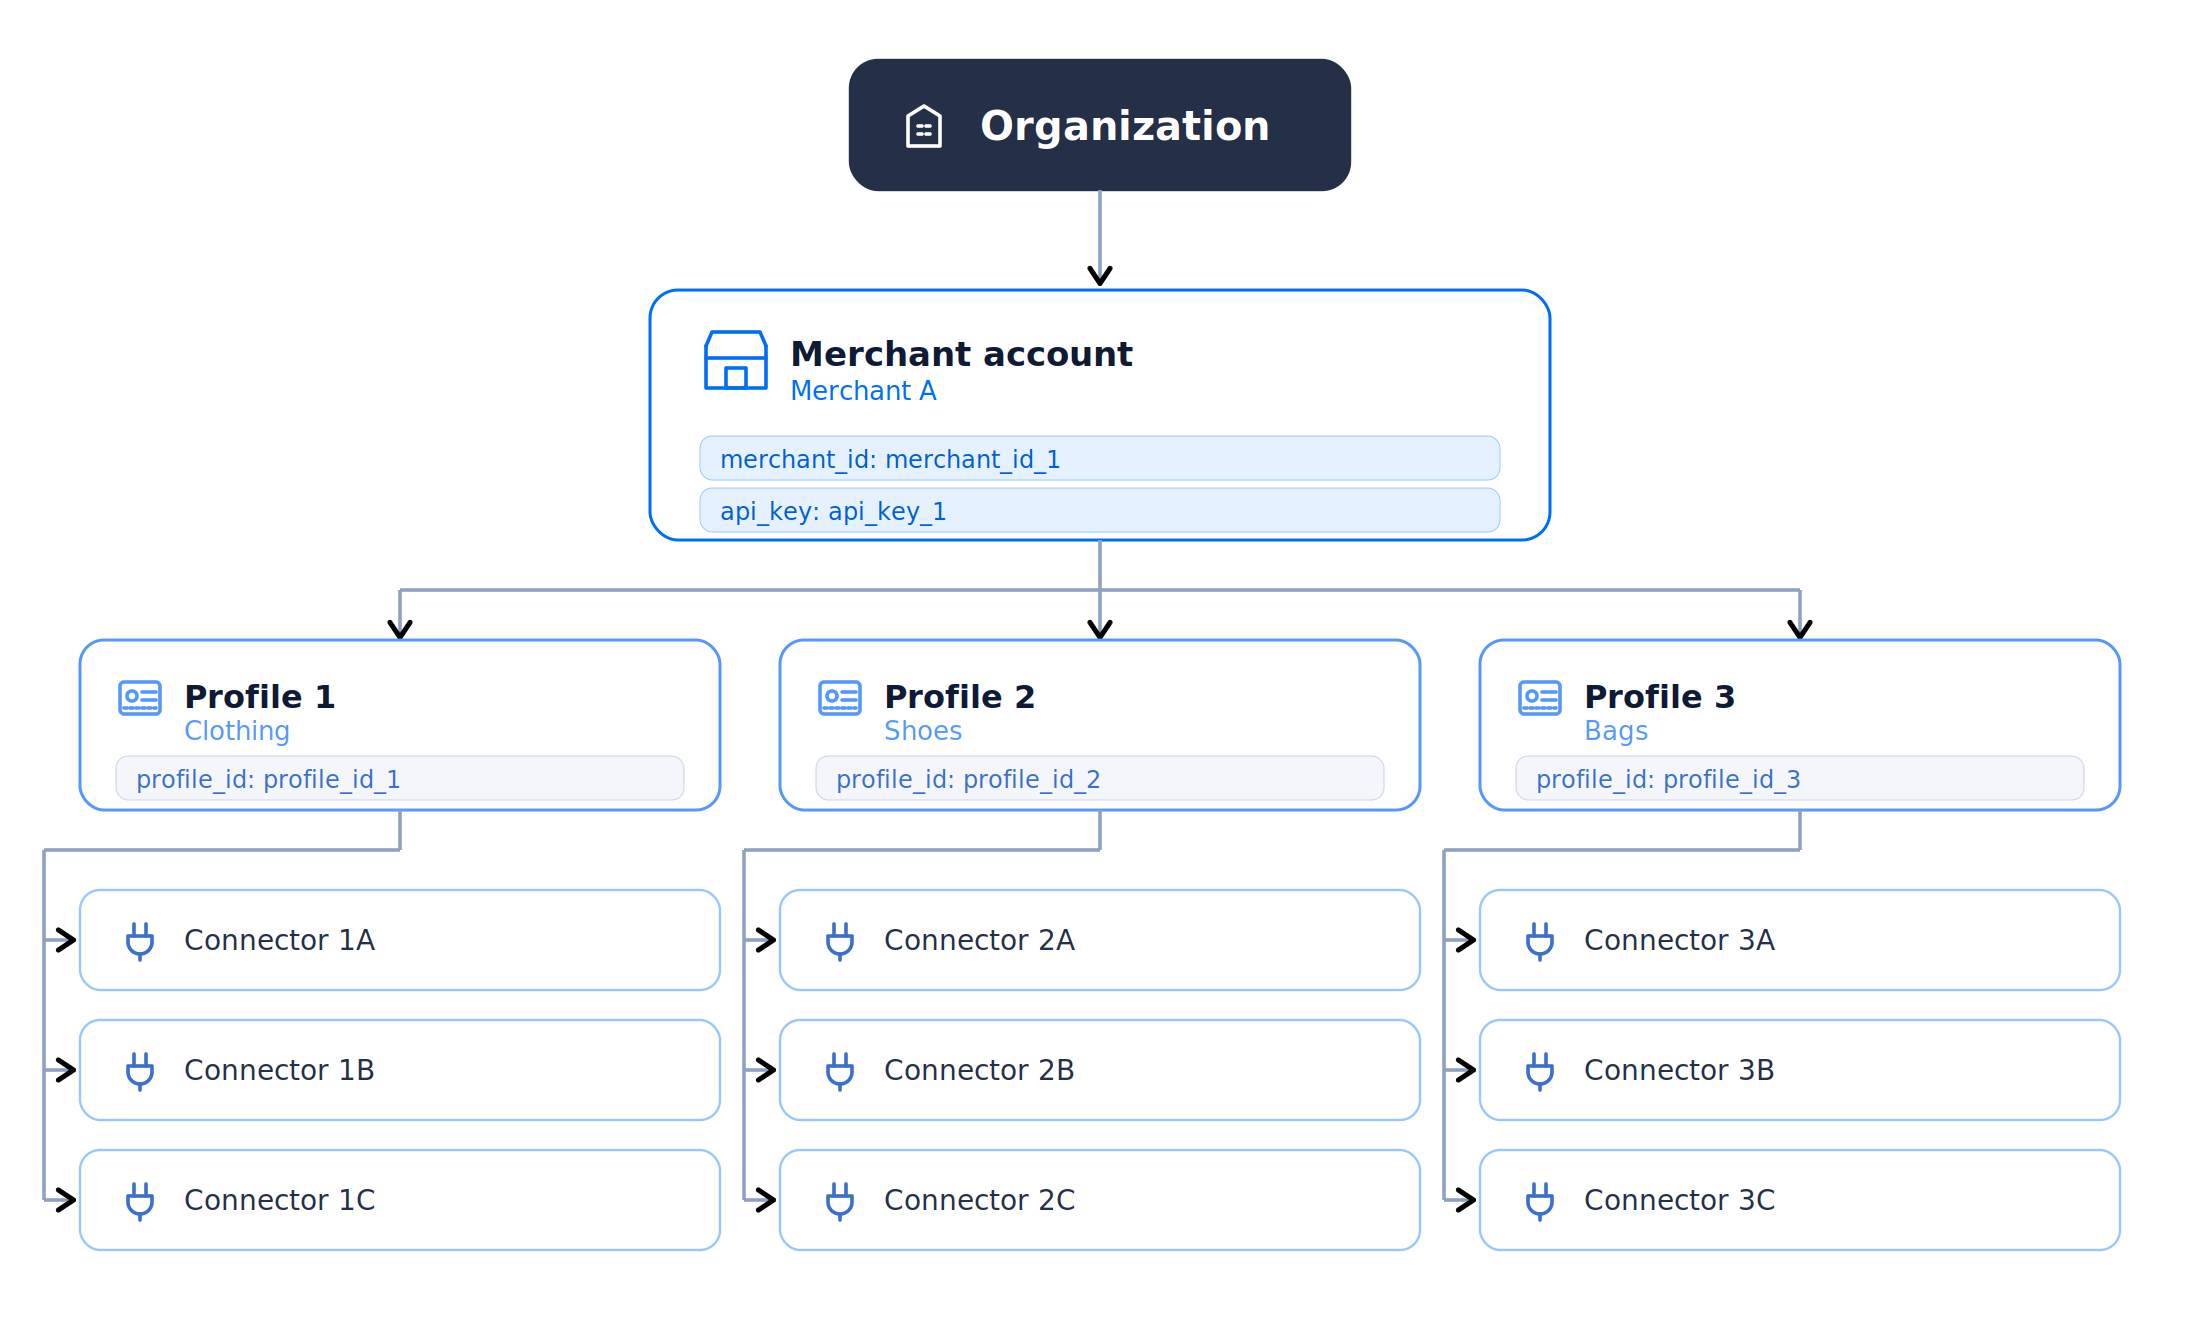
Use multiple profiles under a single merchant account when you want centralised control with one API key, but separate routing or connector configuration per business line.

  • A retailer that wants one API key across Clothing, Shoes, and Bags but different routing rules for each.

  • A marketplace where the parent merchant wants to manage all sub-merchants tightly under one API key.

One Organization with one Merchant Account (Merchant A) and multiple Profiles (Clothing, Shoes, Bags), each with its own Connectors
One Merchant Account with multiple Profiles, each having its own set of Connectors
Configuring Multiple Merchant Accounts

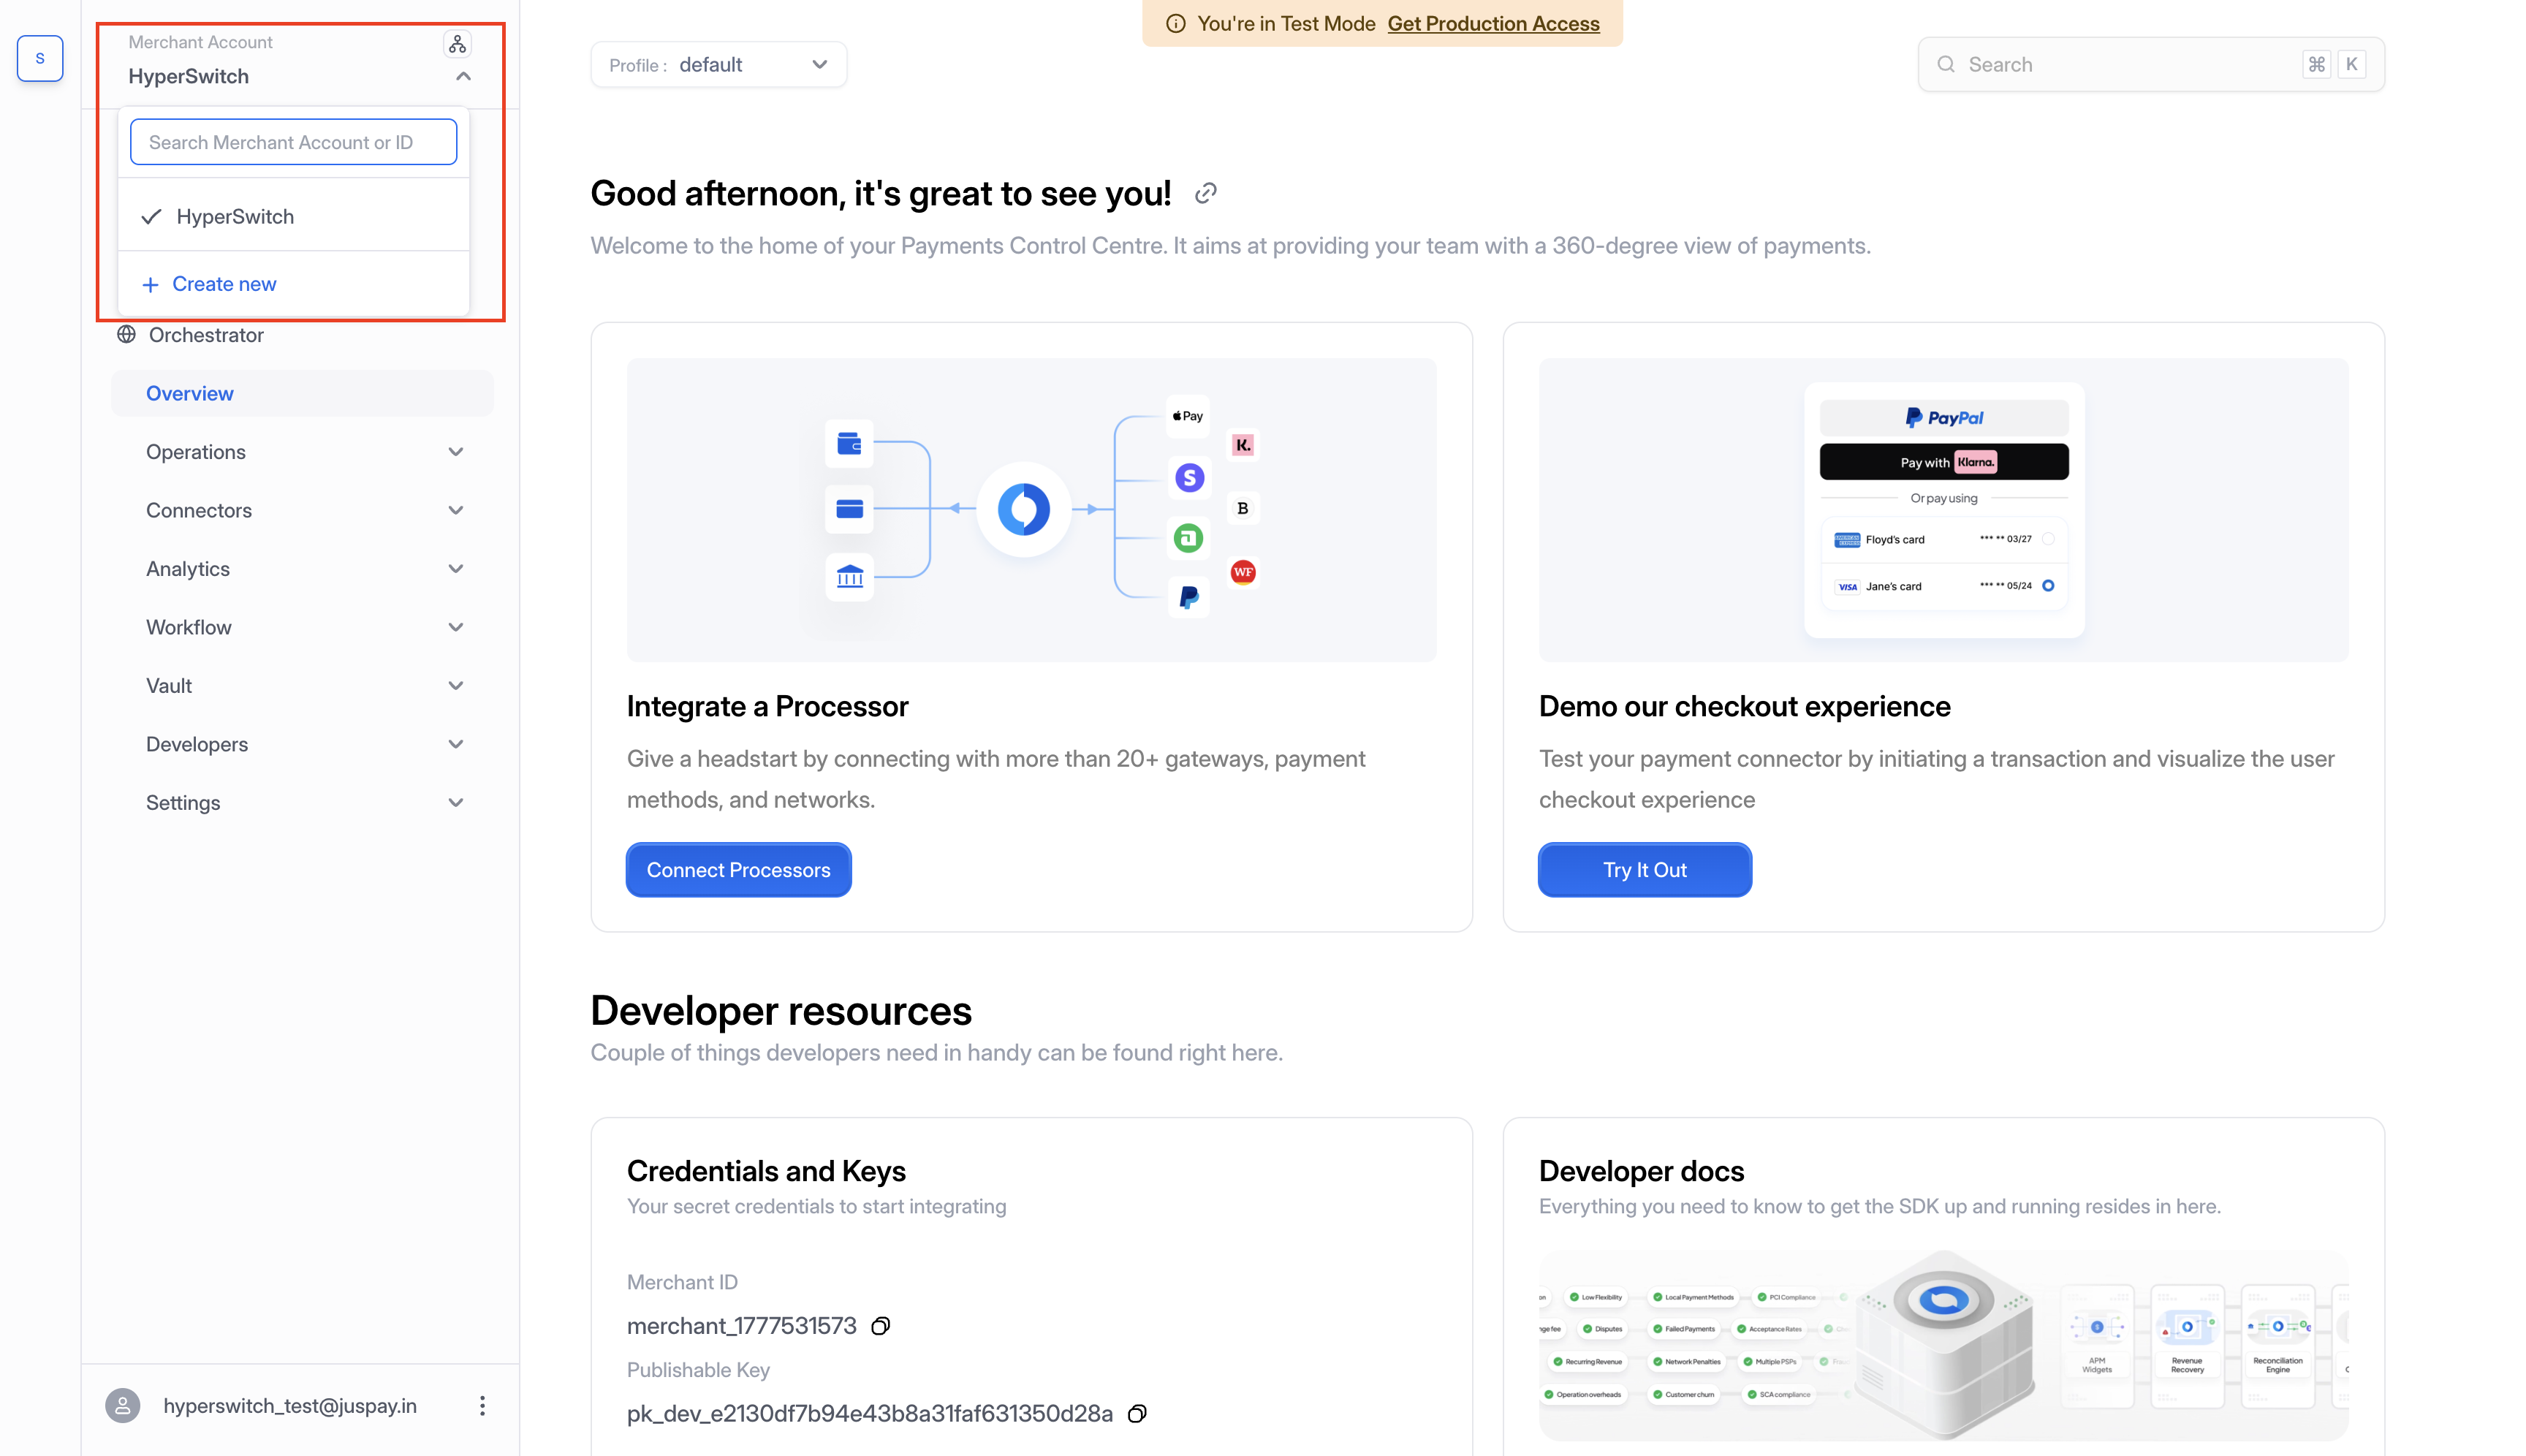
By default, sign-up creates one merchant account under your Organization. To add more:

  1. Click the merchant account dropdown at the top-left of the dashboard.

  2. Click Create new merchant.

  3. Enter the merchant name and confirm.

Sidebar dropdown with the Create new merchant option highlighted
Sidebar merchant dropdown with the "+ Create new" option to add a new merchant
Configuring Multiple Profiles

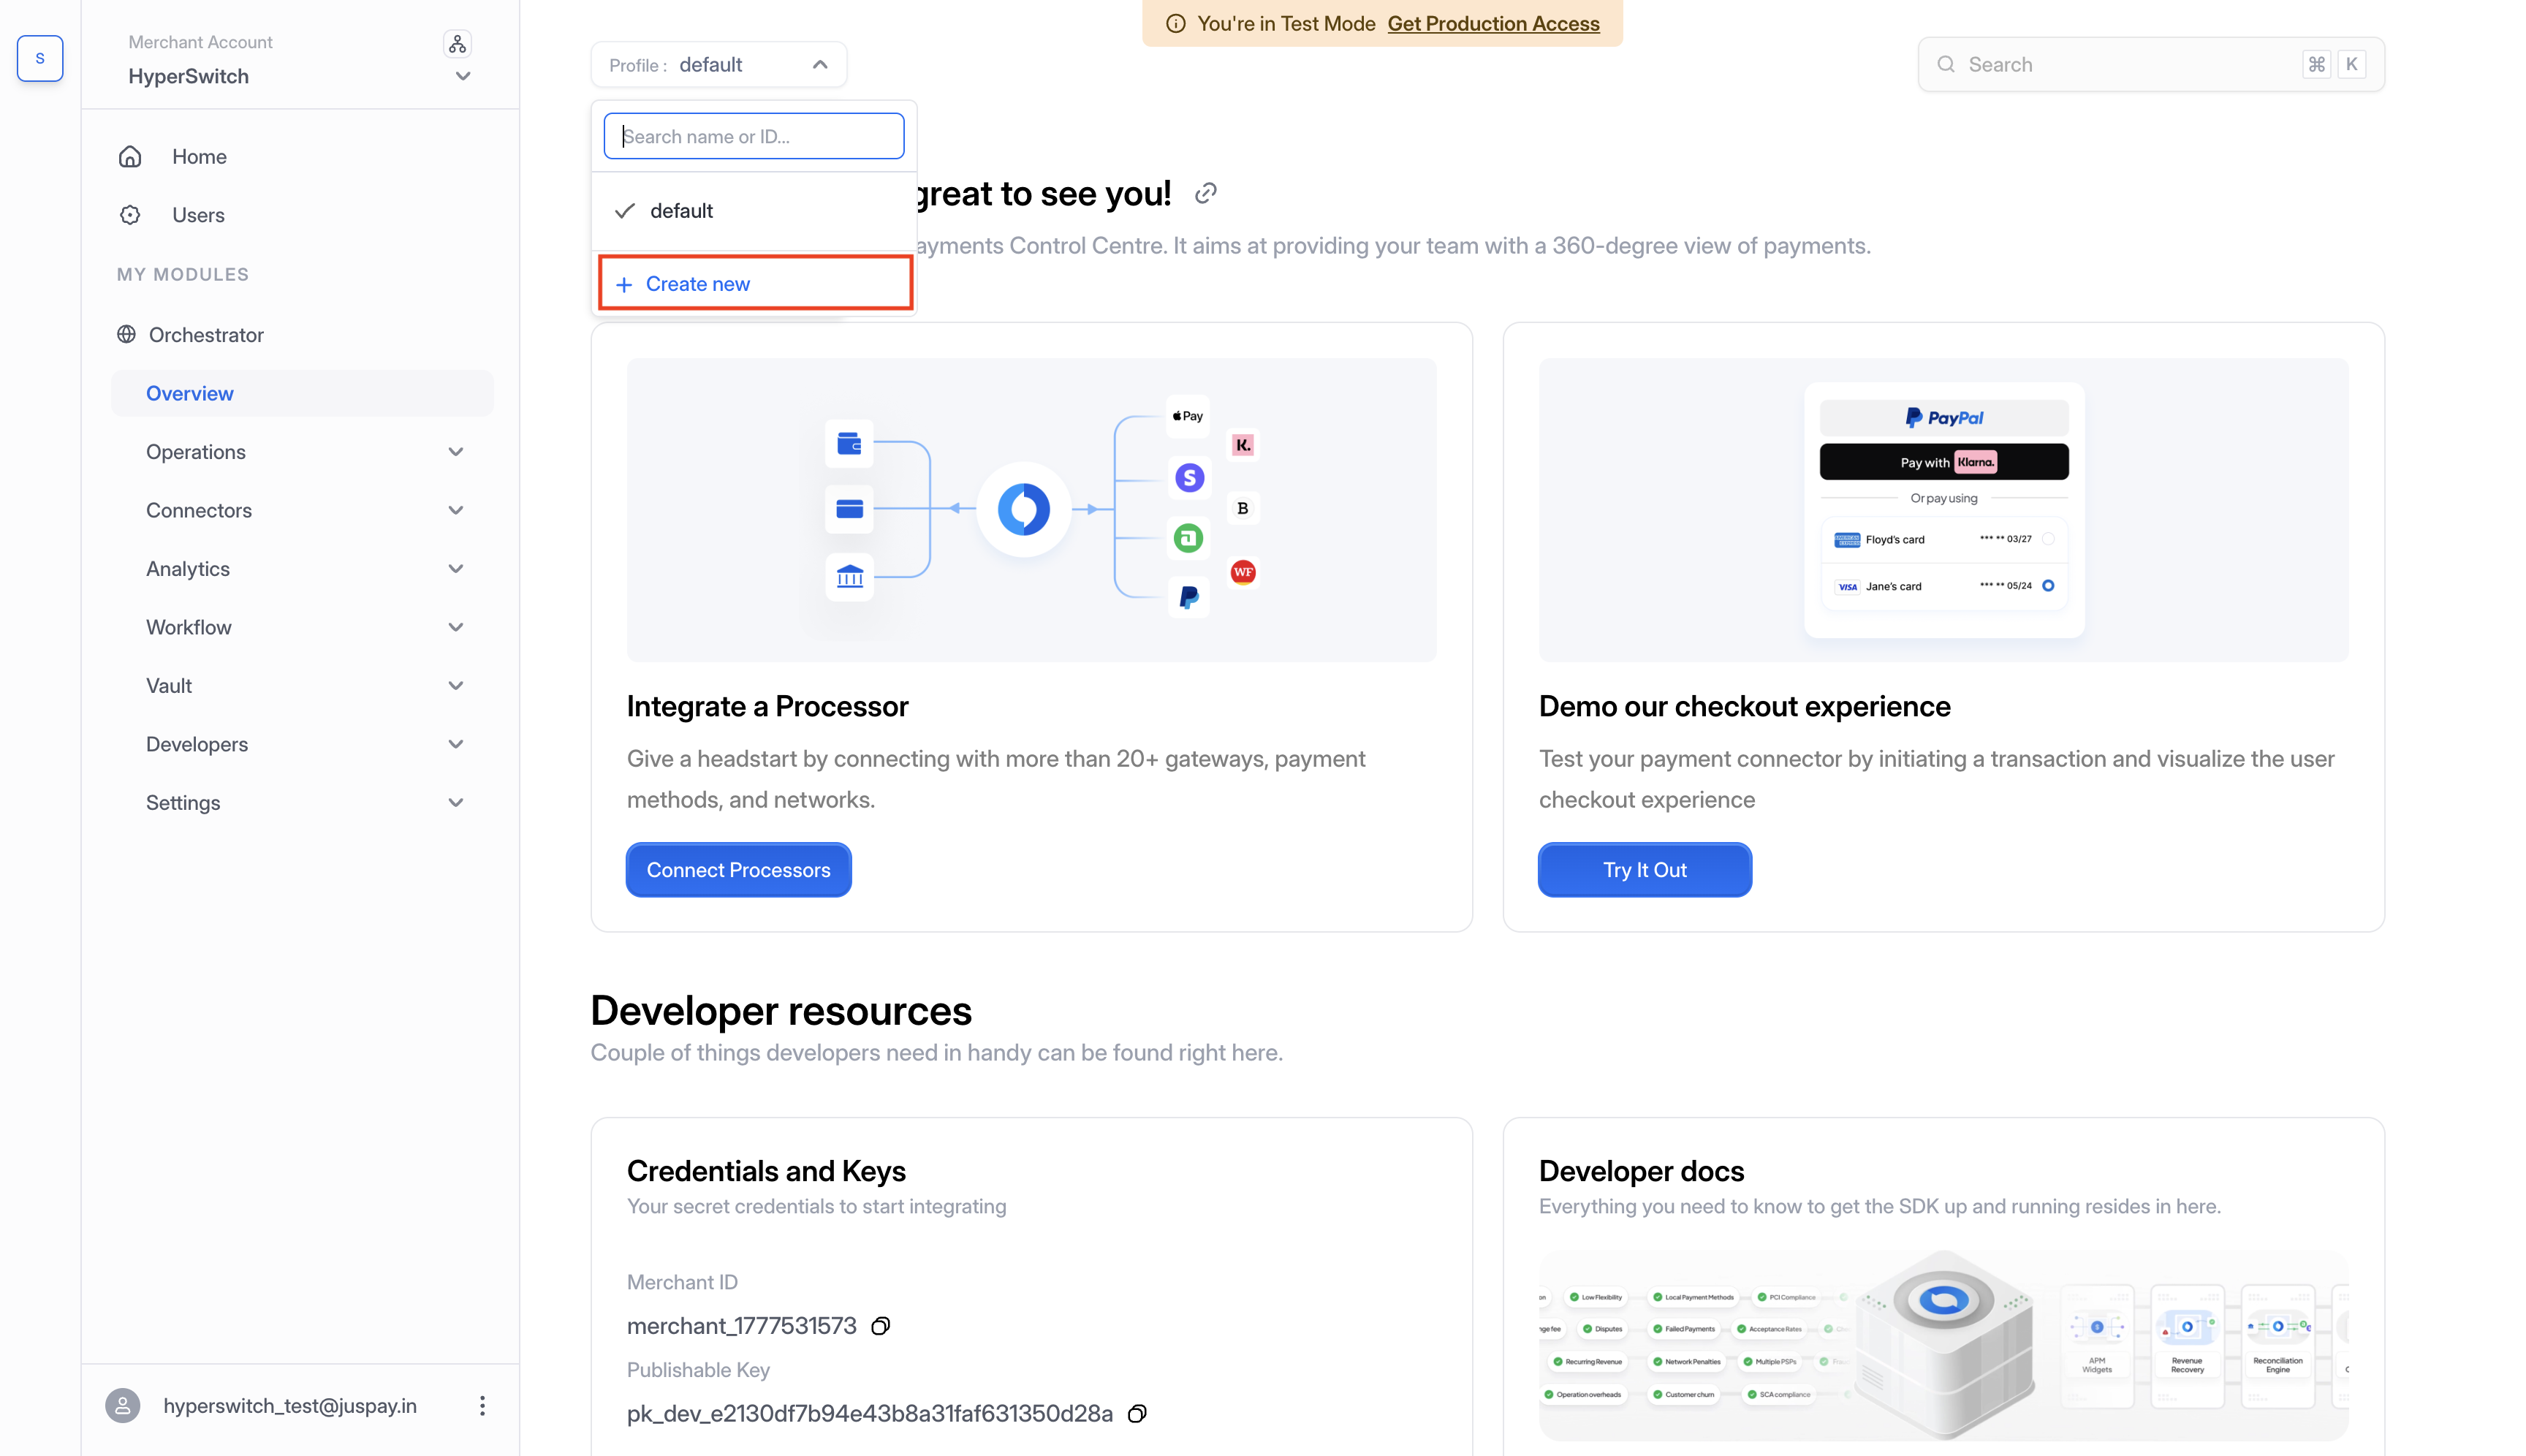
A default profile is created when your merchant account is created. To add more:

  1. Click the profile dropdown at the top-right of the dashboard.

  2. Click Create new profile.

  3. Enter the profile name and confirm.

Profile dropdown with the Create new profile option highlighted
Profile dropdown with the "+ Create new" option to add a new profile

You'll see all configured profiles for your merchant account in the same dropdown. Profile IDs are also visible under Settings then Business Profiles.


Beyond the Standard Hierarchy

For businesses that need to onboard sub-merchants programmatically, generate sub-merchant API keys via API, or share customers and saved payment methods across a connected group, see the Platform Organization model.

If you're not sure which model fits your business, start with Pick the Right Setup for Your Business.

Last updated

Was this helpful?