> For the complete documentation index, see [llms.txt](https://docs.hyperswitch.io/llms.txt). Markdown versions of documentation pages are available by appending `.md` to page URLs; this page is available as [Markdown](https://docs.hyperswitch.io/about-hyperswitch/sdk-payment-flows.md).

# SDK Payment flows

{% hint style="info" %}
If you're complete beginner to Digital Payments, take a look at this [Payments 101 ](https://hyperswitch.io/blogs/payments-101-for-a-developer)blog to get familiar with terminologies.
{% endhint %}

### **Payments flow**

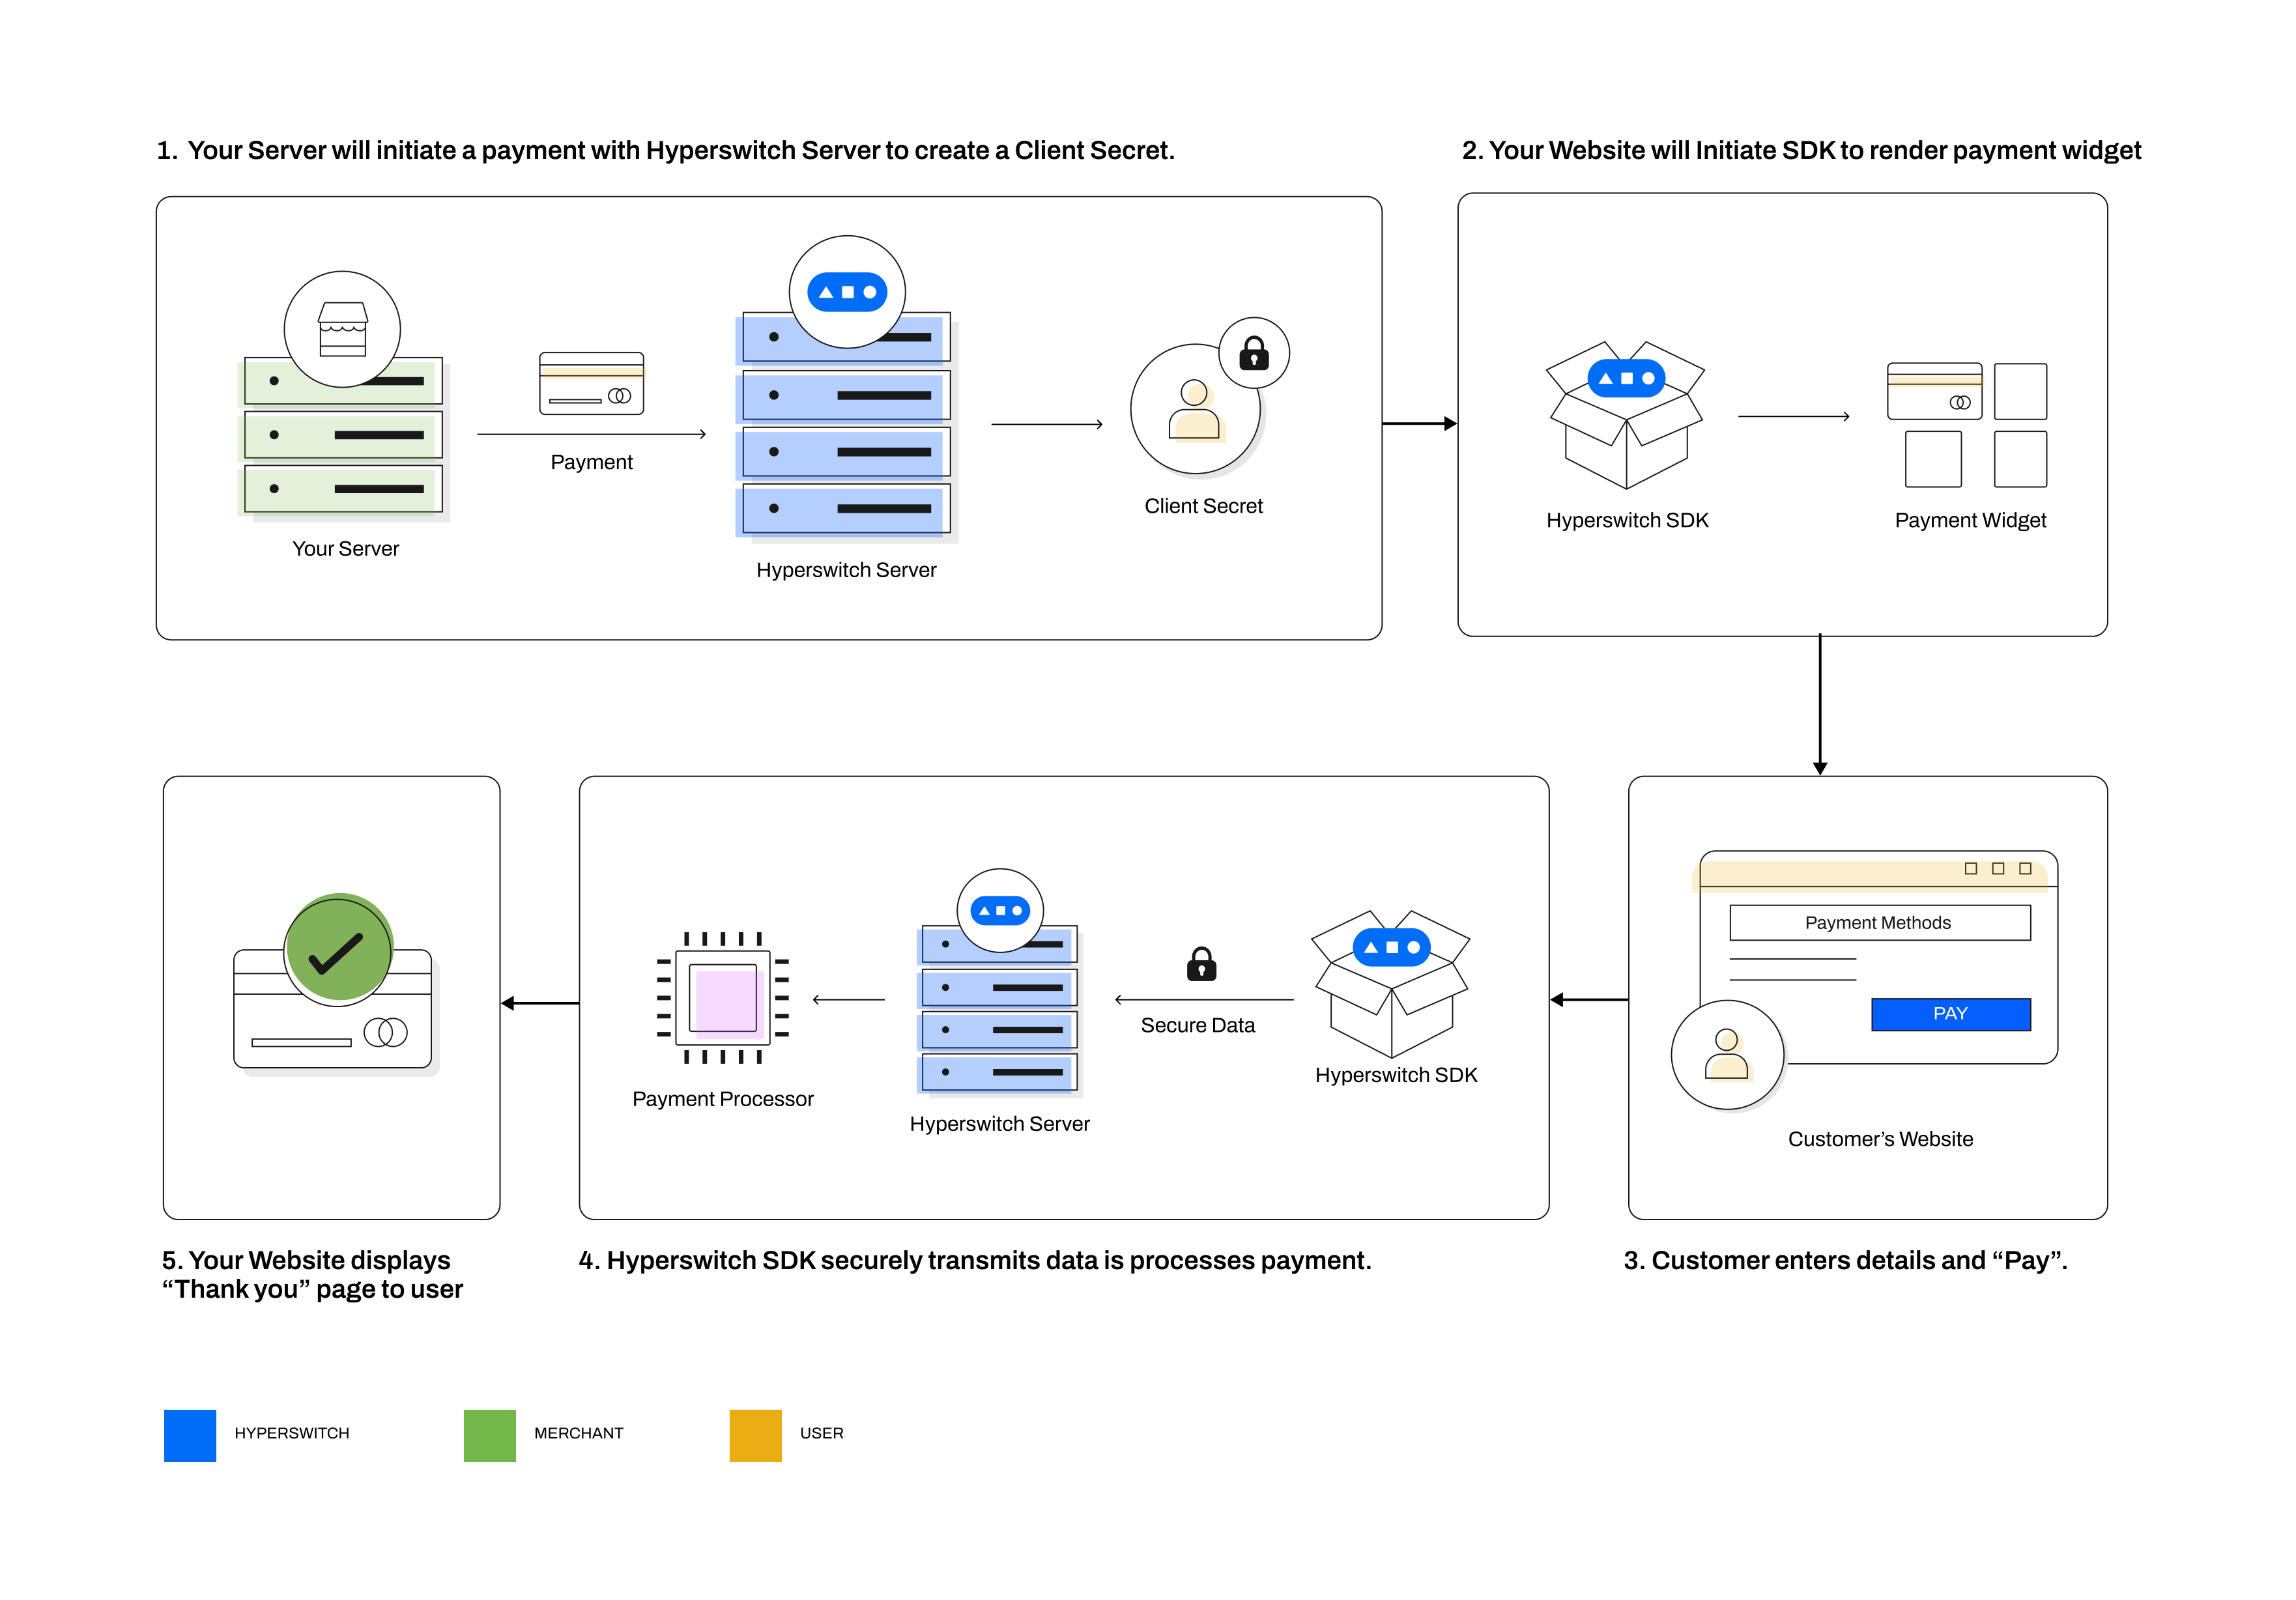
There are multiple stages in a Payment flow depending on the payment methods that are involved. Considering an one-time payment method where there was no redirection involved, the following stages form the Payment flow:

**a) Creating a Payment:** When your customer wants to checkout, create a payment by hitting the payments/create endpoint. Fetch and store the payment\_id and client\_secret

**b) Loading the SDK:** After your customer checks out, load the Hyperswitch SDK by initiating it with the client\_secret and publishable\_key

**c) SDK being rendered:** After you initiate the SDK, the SDK makes several API calls involving the /sessions and /payment\_methods endpoints to load relevant payment methods and any saved cards associated with the customer

**d) Customer enters the payment method data:** After the SDK is fully rendered, your customer would choose a payment method and enter the relevant information and click pay

**e) Confirming the payment:** After the customer clicks pay, the SDK calls the payments/confirm endpoint with the customer's payment method details and post response, it displays the payment status

<figure><img src="https://1943537505-files.gitbook.io/~/files/v0/b/gitbook-x-prod.appspot.com/o/spaces%2Fkf7BGdsPkCw9nalhAIlE%2Fuploads%2Fgit-blob-20fcb06cb4385b13dc22434b4be8a1f772afa3d0%2Fimage.png?alt=media" alt=""><figcaption></figcaption></figure>

Here's a more detailed version of the payment flow:

```mermaid
%%{init: {
  "theme": "base",
  "themeVariables": {
    "primaryColor": "#ffffff",
    "primaryBorderColor": "#2563EB",
    "lineColor": "#2563EB",
    "secondaryColor": "#EFF6FF",
    "tertiaryColor": "#DBEAFE",
    "fontFamily": "Inter, system-ui, sans-serif",
    "fontSize": "14px",
    "textColor": "#000000",

    "actorBkg": "#346DDB",
    "actorBorder": "#999999",
    "actorTextColor": "#ffffff",

    "signalColor": "#000000",
    "signalTextColor": "#696969",

    "labelBoxBkgColor": "#346DDB",
    "labelBoxBorderColor": "#2563EB",
    "loopTextColor": "#000080"
  }
}}%%
sequenceDiagram
    participant MS as Merchant Server
    participant MC as Merchant Client
    participant SDK as Hyperswitch SDK
    participant HS as Hyperswitch Server
    participant PS as Processor Server

    MS->>HS: payments/create (amount, currency, api_key)
    HS-->>MS: payments/create response (payment_id, client_secret)
    MS->>MC: pass client_secret, publishable_key
    MC->>SDK: initiate SDK (client_secret, publishable_key)
    SDK->>HS: /payment_methods_list (client_secret)
    HS-->>SDK: /payment_methods_list response (eligible payment methods)
    Note over SDK: Display payment sheet with eligible methods
    Note over SDK: Customer selects desired payment method <br>(Say Card and Enters their Card Details)
    SDK->>HS: payments/confirm (client_secret, payment_method_data)
    HS->>PS: payments/confirm to processor (with merchant credentials)
    PS-->>HS: payments/confirm response (status)
    HS-->>SDK: payments/confirm response (status)
    SDK-->>MC: return to return_url with status
```

### **How does Payment flow vary across Payment methods?**

<table data-full-width="false"><thead><tr><th>Customer Action</th><th>Direct/Redirect flows</th><th>Payment- finalized immediately</th><th>Payment- finalized later</th></tr></thead><tbody><tr><td><strong>Customer action required before payments/ confirm</strong></td><td><strong>Within Hyperswitch SDK</strong></td><td><ul><li>Non 3DS Cards</li></ul></td><td><ul><li>Bank Debits like ACH Debit, BACS Debit, SEPA Debit</li></ul></td></tr><tr><td><strong>Customer action required before payments/ confirm</strong></td><td><strong>3rd party Redirect/SDK</strong></td><td><ul><li>Wallets like Apple Pay, Google pay, Paypal, AliPay</li><li>BNPL like Klarna, Afterpay, Affirm</li></ul></td><td><br></td></tr><tr><td><strong>Customer action required after payments/ confirm</strong></td><td><strong>3rd party Redirect</strong></td><td><ul><li>3DS cards</li><li>Bank Redirects like iDeal, Giropay, eps</li></ul></td><td><ul><li>Bank Transfers like ACH Transfer, SEPA Transfer, BACS Transfer, Multibanco</li><li>Crypto wallets like Cryptopay</li></ul></td></tr></tbody></table>

### **Functionalities provided by Hyperswitch**

<table data-view="cards"><thead><tr><th></th><th></th><th></th><th data-hidden data-card-cover data-type="files"></th><th data-hidden data-card-target data-type="content-ref"></th></tr></thead><tbody><tr><td><strong>Accept online payments</strong></td><td>Get started with accepting one time payments globally on your online store</td><td></td><td><a href="https://1943537505-files.gitbook.io/~/files/v0/b/gitbook-x-prod.appspot.com/o/spaces%2Fkf7BGdsPkCw9nalhAIlE%2Fuploads%2Fgit-blob-263027ff630d1a5efd50e7139102971168f38f3b%2FonlinePayments.jpg?alt=media">onlinePayments.jpg</a></td><td><a href="/other-features/payment-orchestration/quickstart.md">Accept Payments</a></td></tr><tr><td><strong>Setup mandates &#x26; recurring payments</strong></td><td>Setup payments for a future date or charge your customers on a recurring basis</td><td></td><td><a href="https://1943537505-files.gitbook.io/~/files/v0/b/gitbook-x-prod.appspot.com/o/spaces%2Fkf7BGdsPkCw9nalhAIlE%2Fuploads%2Fgit-blob-2873d33fc916948e356ab34adc9dfbf9f5e5f500%2FrecurringPayments.jpg?alt=media">recurringPayments.jpg</a></td><td><a href="/integration-guide/payment-suite/payments/save-a-payment-method.md">Saving Payment Method</a></td></tr><tr><td><strong>Manage payouts</strong></td><td>Facilitate payouts for global network of partners and service providers</td><td></td><td><a href="https://1943537505-files.gitbook.io/~/files/v0/b/gitbook-x-prod.appspot.com/o/spaces%2Fkf7BGdsPkCw9nalhAIlE%2Fuploads%2Fgit-blob-3dde650e1f133dd5d55e87d222aeac72f5e52d61%2FPayment%20flow%20(1).jpg?alt=media">Payment flow (1).jpg</a></td><td><a href="/other-features/connectors/payouts.md">Payouts Processors</a></td></tr><tr><td><strong>Save a card during payment</strong></td><td>Learn how you can save your customers' cards in a secure PCI compliant manner</td><td></td><td><a href="https://1943537505-files.gitbook.io/~/files/v0/b/gitbook-x-prod.appspot.com/o/spaces%2Fkf7BGdsPkCw9nalhAIlE%2Fuploads%2Fgit-blob-18659562efcb97cb936bb66ddbecb6d93eb61e24%2FsaveCard.jpg?alt=media">saveCard.jpg</a></td><td><a href="/other-features/tokenization-and-saved-cards.md">Tokenization &amp; Vaulting</a></td></tr><tr><td><strong>Manage payments on your platform / marketplace</strong></td><td>Accept payments from your customers and process payouts to the sellers on your marketplace</td><td></td><td><a href="https://1943537505-files.gitbook.io/~/files/v0/b/gitbook-x-prod.appspot.com/o/spaces%2Fkf7BGdsPkCw9nalhAIlE%2Fuploads%2Fgit-blob-2fe2a2bf916c9e922aa7a03ba925e32bda9931b0%2Fmarketplace.jpg?alt=media">marketplace.jpg</a></td><td><a href="/integration-guide/account-management/multiple-accounts-and-profiles.md">Account Setup and Structure</a></td></tr><tr><td><strong>Accept payments on your e-commerce platform</strong></td><td>Give your Wordpress store a lightweight and embedded payment experience with the Hyperswitch WooCommerce plugin</td><td></td><td><a href="https://1943537505-files.gitbook.io/~/files/v0/b/gitbook-x-prod.appspot.com/o/spaces%2Fkf7BGdsPkCw9nalhAIlE%2Fuploads%2Fgit-blob-1e7ee5784724a1b35df8b930fc8f8ef4a5bbfe89%2FWooComerce.jpg?alt=media">WooComerce.jpg</a></td><td><a href="/other-features/e-commerce-platform-plugins/woocommerce-plugin.md">WooCommerce Plugin</a></td></tr><tr><td><strong>Create payment links</strong></td><td>Accept payments for your products through reusable links without writing any code</td><td></td><td><a href="https://1943537505-files.gitbook.io/~/files/v0/b/gitbook-x-prod.appspot.com/o/spaces%2Fkf7BGdsPkCw9nalhAIlE%2Fuploads%2Fgit-blob-d6fdaf70eb62bab3de41cb8a55ab16ae06903b2d%2FpaymentLinks.jpg?alt=media">paymentLinks.jpg</a></td><td><a href="/integration-guide/payment-suite/payment-method-card/payment-links.md">Payment Links</a></td></tr></tbody></table>

### Which SDK surface to reach for

The stages above describe the full checkout sheet. Four other surfaces exist, and picking the wrong one costs a rewrite. Each row is the SDK source of truth, not a spec claim.

| You want                                          | Surface                | Where it lives                                                                                                                                                                                               |
| ------------------------------------------------- | ---------------------- | ------------------------------------------------------------------------------------------------------------------------------------------------------------------------------------------------------------ |
| The whole payment sheet, Hyperswitch renders it   | Payment element        | `elements.create("payment")` on Web. On React Native, `PaymentElement` embeds the sheet in your screen, while `paymentSession.presentPaymentSheet(...)` presents it as a drop-in                             |
| One payment method, your own layout around it     | Single element         | `elements.create("card")` for a whole card form, or `cardNumber`, `cardExpiry` and `cardCvc` mounted separately when you lay the fields out yourself                                                         |
| A wallet button on its own, no sheet              | Wallet element         | One name per call, for example `elements.create("googlePay")`. The others are `applePay`, `payPal`, `samsungPay`, `paze` and `expressCheckout`                                                               |
| Saved methods as data, you draw the UI            | Headless SDK           | `hyper.initPaymentSession(...)` on Web; on React Native `Hyperswitch.init(...)` first, then `initPaymentSession(...)` on what it returns. A saved card with `requires_cvv` still needs the SDK's CVC element |
| Collect and vault a card with no payment attached | Payment method session | `hyper.initPaymentMethodSession(...)`                                                                                                                                                                        |

`elements.create` accepts 14 names in all. The other three are `paymentMethodCollect`, `klarna` and `paymentMethodsManagement`. Anything else logs an unknown-key warning and creates nothing.

### Take React Native to production

The quickstart gets a sheet on screen. Four things separate that from a production app.

**Install the peer dependencies yourself.** `@juspay-tech/react-native-hyperswitch` declares 6 peer dependencies and bundles none of them: `@sentry/react-native`, `react`, `react-native`, `react-native-inappbrowser-reborn`, `react-native-svg`, `react-native-webview`. Install all six. Missing ones surface early rather than at runtime: `react` and `react-native` fail at module resolution, and the Android sources import `react-native-inappbrowser-reborn` classes directly, so leaving it out fails the native build.

**Add the companion packages you need.** Apple Pay and Google Pay are already in the base package, which exports `GooglePayButton`, `ApplePayButton` and the support checks. Eight more packages ship alongside it. Install only the ones you use, because each one adds native weight to your build.

| Package                                                 | What it adds                                                                                                          |
| ------------------------------------------------------- | --------------------------------------------------------------------------------------------------------------------- |
| `@juspay-tech/react-native-hyperswitch-click-to-pay`    | Click to Pay                                                                                                          |
| `@juspay-tech/react-native-hyperswitch-samsung-pay`     | Samsung Pay                                                                                                           |
| `@juspay-tech/react-native-hyperswitch-paypal`          | PayPal                                                                                                                |
| `@juspay-tech/react-native-hyperswitch-netcetera-3ds`   | Netcetera 3DS authentication                                                                                          |
| `@juspay-tech/react-native-hyperswitch-trident-3ds`     | Trident 3DS authentication                                                                                            |
| `@juspay-tech/react-native-hyperswitch-scancard`        | Card scanning                                                                                                         |
| `@juspay-tech/react-native-hyperswitch-vault`           | Hyperswitch's own card form                                                                                           |
| `@juspay-tech/react-native-hyperswitch-payment-methods` | Card collection widgets for an external vault, covering VGS, Skyflow, Basis Theory and Evervault behind one interface |

Choose from your authentication setup as well as your payment methods. The 3DS packages are easy to miss, because nothing about a card payment says out loud that it needs one.

**Set the environment explicitly.** `Hyperswitch.init` takes `environment`, one of `PROD`, `SANDBOX` or `INTEG`. It defaults to `PROD`. A sandbox build that forgets the field points at production.

**Create the session on your server.** `initPaymentSession` takes `sdkAuthorization`, not a client secret. Your backend creates the payment and returns that string. The secret API key never reaches the app.

Step-by-step integration, [Expo](/integration-guide/payment-experience/pay-then-vault/mobile/cross-platform/react-native/expo-integration.md) and [customization](/integration-guide/payment-experience/pay-then-vault/mobile/cross-platform/react-native/customization.md) are in the [React Native guide](/integration-guide/payment-experience/pay-then-vault/mobile/cross-platform/react-native.md).

### Collect a CVC for a saved card on the Web SDK

Use a payment method session, not the payment sheet. `hyper.initPaymentMethodSession({ sdkAuthorization })` returns a session that exposes `createCardForm`, and the form you build decides what happens on `tokenize()`.

One thing to get right first: the `sdkAuthorization` here is not the one a payment hands you. The two look alike, so they are easy to mix up. The SDK decodes the string and looks inside it for a `payment_method_session_id`, and a payment's authorization carries a `payment_id` instead. Pass the wrong one and the session id comes back empty, so the card form never initializes. Create a payment method session for the customer on your backend first, with `POST /v2/payment-method-sessions`, and hand the SDK an authorization for that session.

* Mount `cardCvc` on its own and `tokenize()` runs the update flow against the saved card, which is the CVC-refresh case.
* Mount `cardNumber` and `tokenize()` runs the save flow, vaulting a new card.
* Mount nothing, or `cardExpiry` alone, and `tokenize()` returns `incomplete_field_set`.

So the CVC-only form is not a mode you switch on. It is what you get by mounting exactly one field. The session also exposes `update`, `on`, `deinit` and `fields`, and the form adds `create`, `on`, `tokenize`, `deinit`, `update` and `fields`.

### Mount a wallet button on its own

Both platforms let you put Apple Pay or Google Pay on a page that has no payment sheet.

On Web, create the element by name: `googlePay`, `applePay`, `payPal`, `samsungPay` or `paze`, or `expressCheckout` for the row of every eligible wallet. The button confirms the payment through the SDK.

On React Native, render `GooglePayButton` or `ApplePayButton`. `isGooglePaySupported`, `isApplePaySupported`, `isWalletSupported` and `isPlatformPaySupported` answer whether the device can present the wallet at all, which is worth checking first because a button for a wallet the device cannot present is a dead button. Whether this payment is eligible is a separate answer, and it comes from the wallet session.

To drive the sheet from your own button, render inside `<HyperElements>` and call `load()` from `useWalletSession()`. The hook throws if you use it outside that provider.

The hook hands you `{ walletSession, isGooglePayEligible, isApplePayEligible, loading, load }`. The two eligibility flags are the per-payment answer: whether this payment can use that wallet. The launch methods are not on the hook. They live on the handle that `load()` resolves to, which is also kept in `walletSession` afterwards, and that handle is what carries `launchWallet`, `launchGooglePay` and `launchApplePay`.

Check the handle before you use it. `load()` never throws; when anything goes wrong it resolves to `null` instead. A session that cannot bootstrap within 15 seconds comes back that way, and so does calling `load()` before the payment session is ready. You get the same `null` either way, with nothing to tell the two apart, so log around the call if you need to know which happened.

{% hint style="info" %}
**A standalone wallet button cannot be confirmed from your server.** The button confirms through the SDK and then navigates to your `return_url`. On success it always redirects, so nothing comes back to your page, which means there is no wallet token for you to post to your backend and confirm there. If your flow needs server-side confirmation, drive the payment from your backend instead, which is the [Server to Server Payments](/integration-guide/payment-suite/server-to-server-payments.md) route, and talk to your Hyperswitch contact before you build against anything else.
{% endhint %}

### Get the hosted payment link out of the create response

Send `payment_link: true` on `POST /payments` and the response carries a `payment_link` object. The hosted URL is `payment_link.link`. The object also carries `secure_link`, the URL for the secure variant, and `payment_link_id`.

```json
{
  "payment_id": "pay_mbabizu24mvu3mela5njyhpit4",
  "status": "requires_payment_method",
  "payment_link": {
    "link": "<hosted payment link url>",
    "secure_link": "<secure payment link url>",
    "payment_link_id": "plink_abcdefghijklmnop"
  }
}
```

`secure_link` is always in the response: it carries the secure URL when the profile is configured for secure links, and is `null` when it is not. Send `payment_link_config` on the same request to theme the page. Configuration, theming and custom domains are in [Payment Links](/integration-guide/payment-experience/pay-then-vault/payment-links.md).

### What the Headless SDK exposes

The Headless SDK gives you a customer's saved payment methods as data and leaves the UI to you. One piece stays Hyperswitch's: a saved card that comes back with `requires_cvv` is confirmed by passing the id of a mounted `CardCVCElement`, so the CVC is collected in the SDK's element rather than an input of your own. Everything around it is yours to draw.

On Web, `hyper.initPaymentSession({ clientSecret })` returns a session with two members, `getCustomerSavedPaymentMethods` and `updateIntent`. Await `getCustomerSavedPaymentMethods()` and the object it resolves to is the one that carries both the saved method data and the confirm functions, `confirmWithCustomerDefaultPaymentMethod` and `confirmWithLastUsedPaymentMethod`. Call them on that object, not on the session.

On React Native, `Hyperswitch.init(...)` then `initPaymentSession({ sdkAuthorization })` returns a session exposing `presentPaymentSheet`, `getCustomerSavedPaymentMethods`, `getWalletSession` and `updateIntent`. Await `getCustomerSavedPaymentMethods()` for the saved-methods session, which carries three getters, `getCustomerLastUsedPaymentMethodData`, `getCustomerDefaultSavedPaymentMethodData` and `getCustomerSavedPaymentMethodData`, and the confirm functions, `confirmWithCustomerLastUsedPaymentMethod` and `confirmWithCustomerDefaultPaymentMethod`. The declared type marks the default-method one optional, so guard it before calling rather than assuming it is there. Each getter resolves to a payment method or `null`, and its `card` field is itself nullable, so do not assume a card came back.

It only covers already-saved methods. A first-time card still needs a card form, which means an element or the payment sheet.

Per-platform Headless guides: [Web](/integration-guide/payment-experience/pay-then-vault/web/headless-sdk.md), [Android](/integration-guide/payment-experience/pay-then-vault/mobile/android/headless-sdk.md), [iOS](/integration-guide/payment-experience/pay-then-vault/mobile/ios/headless-sdk.md), [React Native](/integration-guide/payment-experience/pay-then-vault/mobile/cross-platform/react-native/headless-sdk.md) and [Flutter](/integration-guide/payment-experience/pay-then-vault/mobile/cross-platform/flutter/headless-sdk.md).

### Questions this page does not answer

* **Where the PCI SAQ-A boundary sits when you use the hosted SDK.** Hyperswitch has not published a statement of that boundary, so this page does not state one. [Security and Compliance](https://docs.hyperswitch.io/self-hosting/guides-for-self-hosting/security-and-compliance) covers how PCI DSS assessment works, SAQ against ROC, and when a QSA is required. Your assessment level is a QSA question.
* **Driving checkout entirely from your backend.** That is [Server to Server Payments](/integration-guide/payment-suite/server-to-server-payments.md), where one call returns the payment together with its payment-method list and the wallet session tokens. That page says which call does it today.
* **Refunding a payment made through the SDK.** The SDK plays no part; see [Refunds](/integration-guide/payment-suite/refunds.md).

### **What are `PaymentIntent` and `PaymentAttempt` objects and how do they work in Hyperswitch?**

Hyperswitch uses the `PaymentIntent` object to track the status of a payment initiated by you. Since, Hyperswitch enables retrying a single payment multiple times across different processors until a successful transaction, we track each of these payment attempts through separate `PaymentAttempt` objects.

While `PaymentIntent` and `PaymentAttempt` have their own state machines, the various states in `PaymentAttempt` are also constrained by their respective mapping to the `PaymentIntent` statuses.

#### **PaymentIntent state machine:**

The following is an abridged version of the `PaymentIntent` state machine flow that covers majority of the above payment use-cases.

```mermaid
flowchart TD
A{PaymentsAPI} --> |amount,currency|RequiresPaymentMethod 
RequiresPaymentMethod -->|payment_method| RequiresConfirmation 
RequiresConfirmation --> |confirm| Processing 
Processing --> AuthType{auth type\nselection} 
AuthType --> |3ds| RequiresCustomerAction 
AuthType --> |no-3ds| CaptureMethod{capture method\nselection}
CaptureMethod --> |manual| RequiresCapture
CaptureMethod --> |automatic| Succeeded
RequiresCustomerAction --> CustomerAction{customer_action\nresult}
CustomerAction -->|success| CaptureMethod
CustomerAction -->|failure| Failed

RequiresCapture --> |capture|Succeeded
```

#### **PaymentAttempt state machine:**

The following is an abridged version of the `PaymentAttempt` state machine flow that covers majority of the above payment use-cases.

```mermaid
flowchart TD

AuthenticationFailed
AuthenticationPending
AuthenticationSuccessful
Authorized
AuthorizationFailed
Charged
Voided
CaptureInitiated
CaptureFailed
Pending
PaymentMethodAwaited
ConfirmationAwaited
DeviceDataCollectionPending

A{PaymentsAPI} --> |amount,currency|PaymentMethodAwaited
PaymentMethodAwaited -->|payment_method| ConfirmationAwaited
ConfirmationAwaited --> |confirm| Pending

%% Before calling the connector change status to Pending
Pending --> CallConnector{CallConnector}
CallConnector -->|Success| AuthType{auth_type}
CallConnector -->|Fail| AuthorizationFailed
AuthType --> |no-3ds| CaptureMethod{capture_method} 
AuthType --> |3ds| DeviceDataCollectionPending
DeviceDataCollectionPending --> |CollectDeviceData|AuthenticationPending --> Authenticate{Authenticate}
Authenticate --> |Success| AuthenticationSuccessful --> CaptureMethod{capture method}
Authenticate --> |Failure| AuthenticationFailed

%% Capture
CaptureMethod --> |automatic| Charged
CaptureMethod --> |manual| Authorized

Authorized --> |capture| CaptureInitiated --> Capture{Capture at connector}
Capture -->|Success| Charged
Capture -->|Failed| CaptureFailed

%% Payment can be voided after calling the connector but not charged
%% This will not void the payment at connector
DeviceDataCollectionPending -->|void| Voided
AuthenticationPending -->|void| Voided

%% Voiding a payment after it is Authorized will void at connector

```


---

# Agent Instructions
This documentation is published with GitBook. GitBook is the documentation platform designed so that both humans and AI agents can read, navigate, and reason over technical content effectively. Learn more at gitbook.com.

## Querying This Documentation
If you need additional information that is not directly available in this page, you can query the documentation dynamically by asking a question.

Perform an HTTP GET request on the current page URL with the `ask` query parameter, and the optional `goal` query parameter:

```
GET https://docs.hyperswitch.io/about-hyperswitch/sdk-payment-flows.md?ask=<question>&goal=<endgoal>
```

`ask` is the immediate question: it should be specific, self-contained, and written in natural language.
`goal` is optional and describes the broader end goal you are ultimately trying to accomplish on behalf of the user. GitBook uses it to tailor the answer towards what is most useful for that goal.

The response will contain a direct answer to the question and relevant excerpts and sources from the documentation.

Use this mechanism when the answer is not explicitly present in the current page, you need clarification or additional context, or you want to retrieve related documentation sections.